
Redesigning a custom WordPress theme
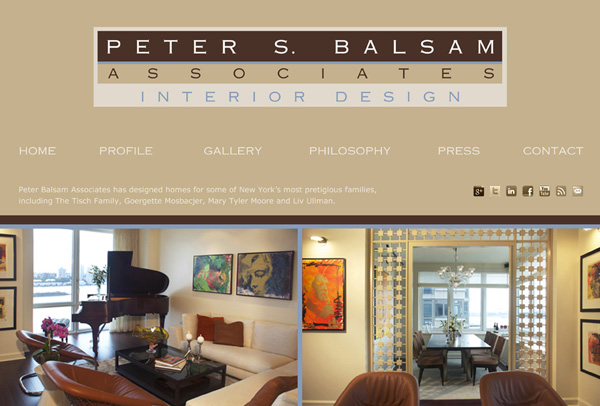
A few years back, SNDI designed the branding and website for New York interior designer, Peter Balsam & Associates. We created a tasteful, custom WordPress theme with the intent of showcasing his designs up front. The homepage features side-by-side staggered sliders and once a visitor ventured inside, they found galleries for residences, and then individually, for kitchen and bath, along with other content such his latest press articles, featured stories, and blog.
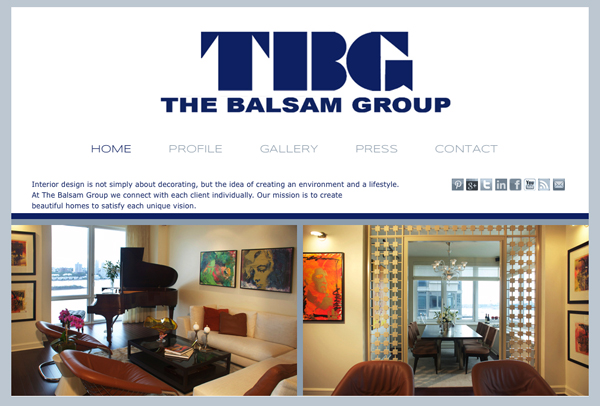
Peter has recently moved to Florida and with the move, has created a new brand, The Balsam Group. This meant a new logo, business cards, and redesigning their website to be brand consistent.
***Be Aware*** Follow these steps ONLY if you are comfortable with the WordPress platform and manually changing the interface with php and css code.
___________________________________________________
Below, I’m going to explain the steps taken in redesigning Peter’s custom WordPress theme, and beyond that what we’d have done if the new site was going to be completely different.
Step 1: Always backup your website before making any changes. Backup the database; download an XML document (within tools) so you have all your content; make a list of the plugins you are using, and the versions; and through an FTP connection all or the parts needed of your website files. (Then make a duplicate and save that dupe elsewhere.)

Step 2: Look at your current theme and using Photoshop, create the new graphic files you’ll need (to replace the old), in the right size and format. Then either upload the files to your WordPress media gallery (through WordPress) or upload them via that FTP transfer. Be sure to copy out the direct url of each image for later usage.
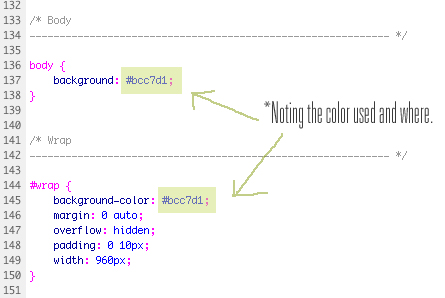
Step 3: Duplicate your style.css (or the name that had been used), so you aren’t editing the original (sometimes I just drag a copy to my desktop). Go through it carefully, line by line and make note of the layout; widths, spacing, colors, fonts, etc. Which style controls the header/slider, the wrapper, footer, etc… and on a separate paper create two columns. In column 1 write the current styles and in column 2, what they are changing to.
Step 4: Very carefully, begin to change the styles to the new ones you want.
I usually edit the whole document before I upload it back to the hosted space. Then, I view the site on a different computer so I can adjust anything else needed while editing it separately (side by side computers makes for an easier time of editing.)
In this particular case, we didn’t change the overall structure we’d created in the original design. We just altered the layout to accommodate the new brand, images, fonts and colors.
Designing a brand new WordPress theme to replace the older one
Had we decided to change the whole structure, the approach would have been different.
We would have designed new layouts in Photoshop, and once approved for development, created a whole new WordPress site, with new coded files and css.
Once we’d installed a new WordPress site in a folder behind the live site, we would have installed the new plugin versions (of the older ones used), because the site would be the latest version of WordPress. Then we’d upload the XML document we’d downloaded previously to add in all the content back in. This is especially great when you’ve used a SEO plugin (such as All in one SEO pack).
The only part that would have needed updating would have been the galleries. But you can manually move copies of them from the old site and reconnected them. Updating the galleries isn’t a problem, because depending on how long ago the original site was created you may have wanted to enlarge the gallery images anyway. With larger monitors and higher resolution screens, an older site might have appeared small, and now you have an opportunity to bring everything up in size and look better.
You can also expand the SEO (search engine optimization) to improve your client’s visibility online by using the names of the old brand and the new, as well as both locations.
Want to learn more about building your WordPress website? Susan Newman has two WordPress courses on Udemy, WordPress Social and WordPress Easy Step-By-Step.